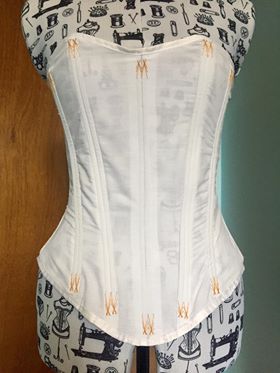
After my beautifully executed fail from the other day (link here), I was very disappointed and decided to give up working on my Cinderella bodice for a few days. You know, focus on my schoolwork, let my back and hands rest... And that plan lasted a total of 24 hours. As I sat down to write a paper for school, I got the idea to get the corset I already own (yes, I have a corset lying around in my closet), trace its panels on some fabric and then create a pattern out of it. So after about 20 seconds of debating if I should be responsible and finish my paper or get another sleepless night of frustrating sewing, the answer was clear.
I pinned my fabric to my corset and traced everything. I cut those pieces up and set them down on my "pattern paper" (I'll get sturdier paper for when I actually want to keep a pattern). I realized after looking at some videos that the boning channels are usually made out of the seam allowance of each panel. So I added a two centimeter seam allowance to each side of my panels. Then I cut out my pieces out of my gigantic bedsheet (yes, I still have leftovers), because I meant for this to only be a mockup; a first fail if you would. I didn't want to waste any more fabric than I already had.
I pinned all of my pieces, sewed everything (it was looong) and ended up with something that vaguely resembled a corset (I forgot to take a picture because it was getting really late and I was too eager to keep going). Then I folded the seam allowance (apparently you're supposed to iron it, but who wants to do that), making sure each side was identical, pinned everything and sewed my boning channels. I have really thin boning so I tried to make the channels pretty small. I ended up with this:
Then I went to bed. Because it was 2am.
But I woke up the next day to the cool idea of putting a second boning channel next to my first ones. So I did that and then took out my roll of boning, my wire cutters and my sand paper (I say "my" but these last two items are obviously my dad's). I measured and cut all the boning I needed, ironed it to make it flat (through the fabric case it came in), filed the ends with sandpaper and proceeded to put everything in the channels.
But. I made some of them too small. Because apparently I didn't think it would be important to measure the withd of my channels (won't make that mistake again). So I undid the seams I needed to undo, put the boning inside and hand-sewed around it. This process... took me hours. But it was worth it because look! It started looking like a real corset!
 |
| (Okay I know I look weird in this picture and it doesn't look... good. But one of my friends took it through facetime and I forgot to take a better one so bear with me please.) |
I then learned to make hand-sewn eyelets (because metal ones are expensive and I don't know how to put them in and I don't have any at home... and these are apparently stronger). I tested my skills on a piece of fabric and then got to work on my actual corset. (My fabric was obviously too light to actually hold eyelets as a real corset, but this was only a test. I do suggest a strong fabric for this, though.) I did a total of 22 eyelets, 11 on each back panel (I know 11 seems random and is kind of an annoying number, but that's how many I needed, I'm sorry). The whole process took me a while, but it gave me an excuse to binge-watch Gilmore Girls for the fourth time.
To finish off the corset, I found out that people (and by people, I mean the few people that make corsets in this modern world) use a ribbon-like thing called " bias tape". So I pinned that to the raw edges on the top and bottom and top-stitched the whole thing.
But I didn't want to end it there. The other day, when I couldn't sleep because of my messed up sleep schedule (I am doing better, I promise), I watched Bernadette Banner's victorian corset video (link here) and learned about a wonderful thing called "flossing". No, not the teeth kind, the corset kind. It's a way of closing up the boning channels to keep the ends from painfully poking you, while keeping everything pretty. So I embroidered the ends of my channels in an attempt to make it convenient and cute!
To add the final touch, I laced the back of my corset with cotton yarn (that I usually use for knitting). I ordered pretty ribbon online, but I'm still waiting for it, so I figured this would work just fine. Not the prettiest, but honestly, I don't really care. I made a freaking corset.
I still can't believe this used to be a bedsheet.
- Héloïse


Comments